
Main Courses
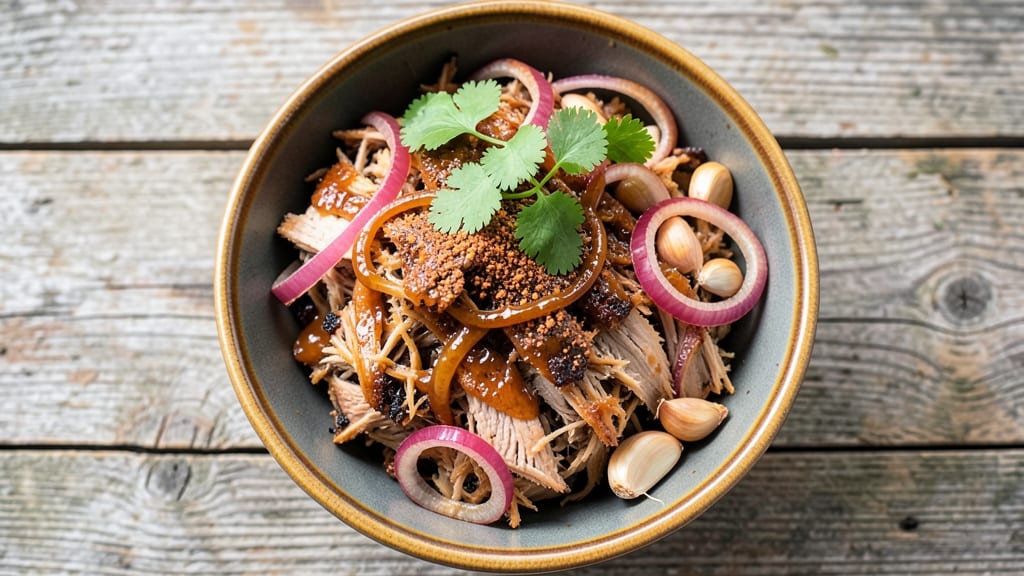
This American pulled pork recipe delivers the kind of tender, hand-shreddable magic that makes every bite worth the wait. After years of perfecting the technique—from my CIA training to running a pit at Atlanta's Smoky Pig—I've cracked the code for restaurant-quality results at home.
The secret? Low-and-slow cooking with precise temperature control, transforming tough pork shoulder into melt-in-your-mouth perfection.
What sets this recipe apart is the balance of traditional Southern techniques and modern precision. You'll start with a dry rub that develops a flavorful bark, then cook the pork to an internal temperature of 203°F—the sweet spot for juicy, shreddable meat.
The slow cooker or smoker does all the heavy lifting, while I share my foolproof method for resting and shredding that guarantees 100% success. No more dry, stringy pork here.
By the time you're done, you'll have juicy, tender pork that falls apart at the touch, ready to be piled high on buns with tangy barbecue sauce. The aroma alone will have your whole house asking what's for dinner.
This isn't just pulled pork—it's a centerpiece for game day, family gatherings, or a cozy weeknight meal that feels like a celebration.
Serve it on toasted buns with pickles and coleslaw, or use it as a hearty topping for baked potatoes. The leftovers? Even better the next day. Let's get started on making the most iconic American dish you'll ever create.
Ingredients for american pulled pork
Eight pounds of pork shoulder and a handful of pantry staples transform into melt-in-your-mouth perfection.
| Ingredient | Amount | Notes |
|---|---|---|
| Pork Shoulder (Bone-In) 🥓 | 8 lb | Bone-in for better flavor |
| Yellow Onion 🧅 | 1 whole | Large, yellow variety |
| Garlic Cloves 🧄 | 8 cloves | Freshly peeled, whole |
| Brown Sugar 🍯 | ½ cup | Light or dark preferred |
| Smoked Paprika 🌶️ | 2 tbsp | For authentic smoky flavor |
| Ground Black Pepper 🌶️ | 1 tbsp | Freshly ground preferred |
| Kosher Salt 🧂 | 1 ½ tbsp | Diamond Crystal preferred |
| Ground Cumin 🌿 | 1 tbsp | Toasted for deeper flavor |
| Mustard Powder 🍯 | 1 tsp | Yellow or Dijon preferred |
| Apple Cider Vinegar 🍏 | ¼ cup | For tangy depth |
| Butter (Unsalted) 🧈 | ½ cup | Cold, cubed for basting |
| Apple Wood Chips 🌳 | 2 lb | For authentic smoky aroma |
| Beer (Optional) 🍺 | 1 cup | Light lager or ale |
The pork shoulder is non-negotiable here—bone-in delivers the best flavor and moisture, though boneless will work in a pinch. Costco or Whole Foods are my go-tos for quality cuts, but any reputable butcher will have what you need. Look for a piece with good marbling—those little fat streaks are what keep the meat juicy during hours of cooking. If you can't find bone-in, go for boneless and add a few extra ounces to compensate. The apple wood chips are a must for that classic Southern smoky profile, but if you're cooking indoors, hickory works just as well. Just soak them in water for 30 minutes before using.
No smoked paprika? Regular paprika plus a pinch of liquid smoke gets you close, though nothing beats the real thing. Running short on apple cider vinegar? White vinegar or even lemon juice will do in a bind, though the flavor won't be identical. The beer is optional but worth it—it adds depth and helps tenderize the meat. If you skip it, just add an extra splash of apple cider vinegar. For the rub, Penzeys or Spicewalla are great for quality spices, but the grocery store stuff works fine if it's fresh. The key is to mix everything together in a bowl and pat it all over the pork until it's evenly coated. Don't skip this step—it's what creates that flavorful bark.
This isn't a recipe you'll want to rush. The pork needs to rest for at least 2 hours after cooking before shredding—this lets all those juices redistribute. Wrap it tightly in foil and let it sit while you make your buns and sauce. Leftovers? 5 days in the fridge, 3 months frozen. I always make extra—it's perfect for sandwiches, tacos, or even loaded baked potatoes. Store it in its juices to keep it moist, and reheat it low and slow in the oven or on the stovetop with a splash of water or broth.
Why You'll Love This Recipe
- Crowd-Pleasing Crunch: That crispy, smoky bark on the outside? Pure magic. The brown sugar and paprika team up to give it a deep, almost charred flavor, while the inside stays tender enough to pull apart with a fork. My picky-eating uncle actually asked for seconds—high praise.
- Leftovers That Don’t Suck: Honestly, I make this just for the leftovers. The pulled pork keeps for days, and I’ll throw it into tacos, sandwiches, or even fried rice without breaking a sweat. (Yes, even on a Tuesday night when I’m too tired to cook.)
- Budget Meal, Big Flavor: A pork shoulder costs a fraction of pre-made pulled pork, and this recipe stretches it across multiple meals. The onions and garlic add depth for pennies, while the paprika and brown sugar make it taste like a restaurant dish. My secret weapon for feeding the family without overspending.
Step-by-step instructions for slow-smoked pulled pork
Here's how to transform that tough pork shoulder into melt-in-your-mouth perfection.
Prepare the Rub and Season the Pork
In a medium bowl, combine the 0.5 cup brown sugar, 2 tbsp smoked paprika, 1 tbsp ground black pepper, 1.5 tbsp kosher salt, 1 tbsp ground cumin, and 1 tsp mustard powder. Mix thoroughly until the sugar dissolves completely and the spices form a uniform paste. This is your flavor foundation - don't skip the mixing.
Pat the 8 lb pork shoulder completely dry with paper towels, then generously coat it with the rub mixture. Press the spices into the meat so they adhere well. For extra flavor penetration, I like to make small slits in the fat cap and tuck a few of the 8 cloves garlic into them. Wrap the pork in plastic wrap and refrigerate for at least 4 hours or overnight - this resting period lets the rub work its magic.
Set Up Your Smoker for Low and Slow Cooking
While the pork rests, prepare your smoker. Soak the 2 lb apple wood chips in water for 30 minutes to prevent burning, then drain. Set your smoker to 225°F and add the soaked wood chips. You want to see thin, blue smoke - not thick white smoke - indicating proper combustion. This gentle temperature is crucial for tenderizing the tough connective tissue.
Place the pork shoulder fat-side up on the smoker grate. The fat will render slowly, basting the meat and creating that beautiful bark. I always add a water pan to the smoker - this helps maintain moisture and prevents the pork from drying out during the long cook. Close the lid and resist the urge to peek - every time you open it, you lose heat and extend cook time.
Smoke Until Probe-Tender (The Long Game)
Smoke the pork for 8-10 hours until the internal temperature reaches 165°F. This is where patience pays off - the collagen in the connective tissue breaks down slowly, transforming into gelatin that makes the meat tender. You'll notice the pork hits "the stall" around 160°F - the temperature plateaus as moisture evaporates. Don't panic; this is normal and expected.
Here's the pro move: When the pork hits 165°F, wrap it tightly in butcher paper (not foil - paper breathes better). Return it to the smoker and continue cooking until the internal temperature reaches 203°F. The paper wrap helps power through the stall while preserving that beautiful bark. The pork should now be fork-tender with no resistance when you test it with a meat probe.
Rest and Shred for Maximum Juiciness
Transfer the pork to a cutting board and let it rest for 1 hour before shredding. This resting period allows the juices to redistribute throughout the meat - skipping this step results in dry, stringy pulled pork. While it rests, I like to make a quick basting sauce by melting the 0.5 cup unsalted butter in a saucepan, then whisking in the 0.25 cup apple cider vinegar and 1 cup beer (if using). Simmer for 5 minutes to reduce slightly.
After resting, remove any large fat deposits and discard them. Using two forks or meat claws, shred the pork against the grain into ¼-inch thick strands. The meat should pull apart easily with minimal effort - if it's still tough, return it to the smoker for another 30 minutes at 250°F. Toss the shredded pork with the basting sauce and mix thoroughly to coat each strand evenly.
Serve with Confidence
Serve the pulled pork immediately while still warm. The strands should be tender enough to eat with a spoon, with a beautiful mahogany bark on the exterior. For serving, I like to pile the pork high on a platter and garnish with thinly sliced yellow onion rings. The sweetness of the caramelized onions complements the smoky, tangy flavors perfectly.
This pulled pork makes 6 generous servings - perfect for feeding a crowd. The meat should be juicy with visible moisture, not dry or stringy. Each bite should deliver that perfect balance of sweet, smoky, and tangy flavors that define great American pulled pork. Leftovers keep well in the refrigerator for 4 days or can be frozen for 3 months - just reheat gently with a splash of broth to restore moisture.
Pro Tips For Making American Pulled Pork
- CRANK THE HEAT FIRST: Sear the pork shoulder in a screaming-hot pan for 3-4 minutes per side before slow cooking—this isn’t just for flavor, it’s the only way to lock in moisture when you’re dealing with a big, fatty cut. I learned this the hard way after serving dry pulled pork to a crowd and watching them quietly abandon their plates.
- CHOP ONIONS LIKE YOU MEAN IT: Dice the yellow onion into ¼-inch pieces, not thin slices—you want them to break down into the rub but still hold shape enough to add texture. I used to skip this and ended up with a mushy, watery sauce that made the whole dish taste bland.
- DON’T RUSH THE REST: After pulling, let the pork rest under foil for at least 15 minutes before shredding—this lets the juices redistribute so every bite is tender, not stringy. I know, I know, you’re hungry, but cutting into it too soon turns that juicy dream into a sad, dry mess.
- SMASH THE GARLIC: Peel and smash the garlic cloves with the flat side of your knife before adding them to the pan—this releases more flavor and prevents burning. I was skeptical until I tried it, and now I can’t imagine doing it any other way.
Common mistakes when making your american pulled pork
Skipping the Rest
I can't stress this enough: never skip the resting period after cooking. The pork needs at least 1 hour to redistribute juices—cutting into it too soon means dry, stringy results. I've seen home cooks rush this step and end up with pork that falls apart but tastes bland.
Trust me, the wait is worth it for that first perfect bite. 💡
Overlooking the Stall
Many beginners panic when the pork hits 160°F and the temperature stalls. This is completely normal—the meat is releasing moisture as collagen breaks down. The fix? Wrap it in butcher paper (not foil) when it hits 165°F and keep smoking until 203°F.
I've lost count of how many times I've seen people pull pork too early because they didn't understand this critical phase.
Ignoring Temperature Control
Consistent 225°F is non-negotiable. Fluctuations above 250°F dry out the meat, while below 200°F risks food safety issues. I use a ThermoWorks Smoke thermometer to monitor both smoker temp and internal temp. Even a 10°F swing can ruin hours of work. Keep that heat steady!
Using the Wrong Wood
Apple wood is classic for a reason—it gives that clean, sweet smoke. Hickory works, but it's stronger and can overpower delicate flavors. I've seen people use cherry wood (great for ribs) and end up with pulled pork that tastes like a dessert.
Stick to apple or hickory for authentic results. 🌳
Shredding Against the Grain
This is a common mistake that ruins texture. The pork's muscle fibers run in one direction—shredding perpendicular to them creates shorter, more tender strands. I've had cooks shred with the grain and end up with chewy, stringy pulled pork. Always look for the grain pattern before you start shredding.
Not Basting Enough
The fat cap on pork shoulder renders slowly and bastes the meat naturally, but adding extra moisture helps. I like to baste with melted butter and apple cider vinegar every 2 hours during cooking.
Skipping this step can lead to dry spots, especially if your smoker runs dry. Keep that meat moist at all costs!
Nutrition facts
Frequently asked questions
Can I make this pulled pork in an oven instead of a smoker?
Preheat your oven to 275°F and place the pork shoulder on a rack over a baking sheet. Add 1 cup water to the pan below and cover tightly with foil. Cook for 5-6 hours until it reaches 203°F internally. The foil creates a similar moisture environment to smoking, though you'll miss that authentic smoky flavor. For extra depth, brush the pork with apple cider vinegar every 2 hours.
How do I know when the pork is done?
Use a meat thermometer to check the internal temperature—it should read 203°F in the thickest part. The meat should also be fork-tender with no resistance when pierced. Pro tip: The pork will continue rising 5°F after removing it from heat, so pull it out when it hits 200°F if your thermometer is accurate. Never rely on time alone!
Can I use a slow cooker instead of smoking?
Yes! Place the seasoned pork in your slow cooker with 1 cup beef broth and cook on LOW for 8-10 hours until tender. For extra flavor, add 1 tbsp liquid smoke or ½ cup BBQ sauce in the last 2 hours. The texture won't be identical to smoked pork, but it's a great backup method. Just be sure to wrap it in foil during the last 1 hour to help it reach 203°F.
What's the best way to reheat leftovers?
Never microwave pulled pork—it dries it out! Instead, reheat in a skillet over low heat with 2 tbsp apple cider vinegar or broth until warmed through (165°F). For large batches, use a slow cooker on LOW for 2-3 hours with a splash of liquid. The key is keeping it moist—never let it dry out. Leftovers actually improve in flavor over 2-3 days!
How do I make the bark extra crispy?
For that perfect mahogany crust, start with a bone-in shoulder—the bone helps create a better bark. After seasoning, let the pork sit uncovered in the fridge for 24 hours so the rub forms a hard crust. When smoking, keep the fat cap up and avoid opening the smoker too often. For extra crispiness, finish with 5 minutes of direct heat at 275°F before resting. A good bark should be firm but not brittle!