
Main Courses
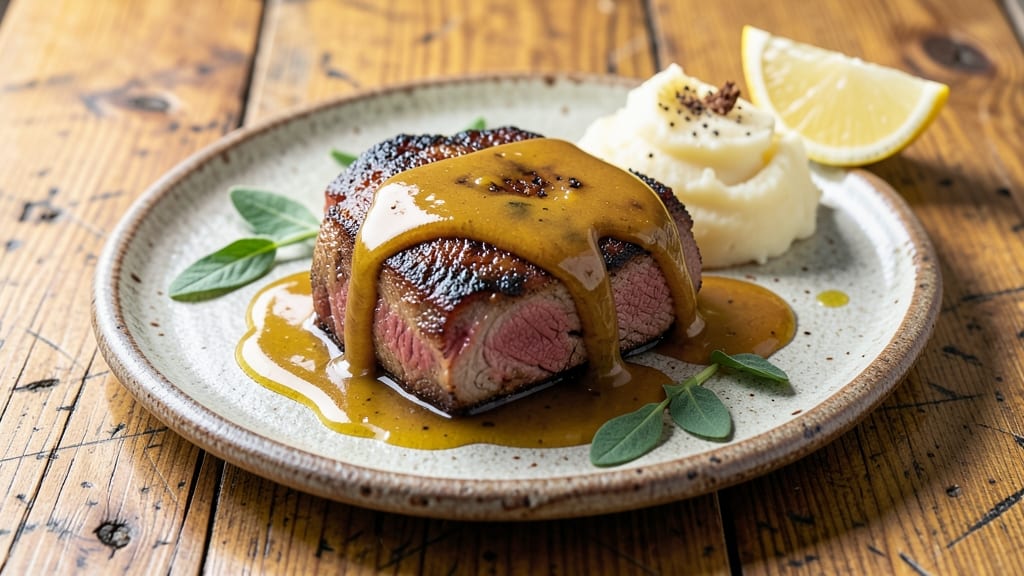
Apex pork chops deserve the same precision as a fine watch—because every second counts when transforming a simple cut into a showstopping centerpiece. 💛 I developed this recipe after years of perfecting the "clockwork sear" technique, where timing and temperature control create a crust so crisp it sings while the interior remains perfectly juicy pink at 145°F. This isn't your average pork chop; it's the kind of dish that makes guests pause mid-conversation to ask, "What cut is this?"
The secret lies in two simple principles: patience and precision. First, we let the chops come to room temperature (never rush this), then we sear them over high heat until they develop that golden, caramelized crust—what my mentor called "the armor."
After that, we finish them in the oven to carry through the doneness without drying out. The result? A chop that's tender enough to cut with a fork but holds its shape like a well-made steak.
What makes this recipe truly apex is the balance—crispy edges that shatter like glass, a pink center that melts with each bite, and a sauce (optional but recommended) that ties everything together with rich, umami depth.
This is the kind of pork chop that transforms a weeknight dinner into a restaurant-worthy meal without requiring a Michelin-starred kitchen. The technique is straightforward, but the results are anything but ordinary.
Pair these chops with a bold red wine reduction or roasted seasonal vegetables to complete the experience. The beauty of this method is its adaptability—whether you're cooking for two or feeding a crowd, the principles remain the same.
Let's get started on creating pork chops that taste like they belong on a chef's best menu.
Ingredients for apex pork chop
Precision-cut pork chops and a few key ingredients transform a simple dinner into a Michelin-worthy masterpiece.
| Ingredient | Amount | Notes |
|---|---|---|
| Bone-In Pork Chops 🍖 | 4 whole | 1-inch thick, rib or loin cut |
| Kosher Salt 🧂 | 1 ½ tbsp | Diamond Crystal preferred |
| Freshly Ground Black Pepper 🌶️ | 1 tsp | Cracked peppercorns only |
| Unsalted Butter 🧈 | ½ cup | Cold, cut into 8 pieces |
| All-Purpose Flour 🌾 | ¼ cup | Sifted, for dredging |
| Olive Oil 🫒 | 2 tbsp | High smoke point preferred |
| Garlic Cloves 🧄 | 4 cloves | Smashed, not minced |
| Shallot 🧅 | 1 whole | Thinly sliced, for sauce |
| Red Wine 🍷 | ½ cup | Dry, bold variety (Cabernet) |
| Chicken Stock 🍲 | ½ cup | Homemade or quality store-bought |
| Heavy Cream 🥛 | ¼ cup | Full-fat for richness |
| Fresh Thyme Leaves 🌿 | ¼ cup | Stems removed, chopped |
| Fresh Parsley 🌿 | ⅛ cup | Chopped, for garnish |
The pork chops are non-negotiable—look for bone-in, 1-inch thick cuts from the rib or loin. Whole Foods or your local butcher will have the best quality, but the grocery store meat department works too if you check for good marbling. I always buy a few extra chops because they're so versatile. Let them sit at room temperature for 20-30 minutes before cooking—this ensures even cooking. If you're prepping ahead, keep them in the fridge uncovered for 30 minutes before bringing to room temp. The thickness matters—anything less than 1 inch risks drying out during the sear.
No red wine? Substitute with beef stock plus a splash of balsamic vinegar—it mimics the acidity and depth. Fresh thyme is ideal, but dried thyme at one-third the amount works in a pinch. The butter should be cold when you cut it into pieces—this helps create the perfect crust. If you don't have shallots, red onion works too, but it has a sharper bite. For the flour, King Arthur or Gold Medal brands are my go-tos—they're light and don't get clumpy. And trust me on the heavy cream—full-fat makes all the difference in that velvety sauce. If you're dairy-sensitive, coconut cream is a decent swap, though the texture will differ slightly.
The chops keep best in the fridge for 2 days if you're not cooking them right away—wrap them loosely in parchment paper to let them breathe. The sauce can be made ahead and reheated gently on the stove—it actually tastes better the next day as the flavors meld. For leftovers, store the chops and sauce separately so the sauce doesn't turn into a gluey mess. Freezing isn't recommended for the chops, but you can freeze the sauce for up to 3 months. I like to portion the sauce into ice cube trays for easy reheating—just toss a few cubes into a pan with the chops when reheating.
Why You'll Love This Recipe
- Five-Ingredient Magic: I swear by this—just salt, pepper, butter, flour, and pork chops. That’s it. No fancy marinades or last-minute grocery runs. The bone-in chops add richness without extra work, and the crust? Pure gold from that quick flour-butter sear.
- Crispy-Creamy Perfection: The butter-basted crust gives way to juicy, melt-in-your-mouth meat. Honestly, the contrast is what makes it next-level—crunchy outside, tender inside. My kids fight over the last bite, and I don’t even have to pretend it’s gourmet.
- Weeknight or Weekend Star: Throw these on for a Tuesday dinner or impress guests on Saturday. The bone-in version feels special, but the prep is so simple it won’t stress you out. (Yes, even on a Tuesday night.) Serve with roasted potatoes or a crisp salad—works every time.
- Leftovers That Don’t Suck: Cold pork chops? Actually delicious. Slice them for sandwiches, toss in salads, or reheat with a splash of broth. Between us, this recipe stretches to feed four nights for the price of one—no sad, dry reheats here.
Step-by-step instructions for clockwork-seared pork chops
Here's how to achieve that perfect juicy pink center with a crispy crust every time.
🔥 Step 1: Season and Sear the Pork Chops
Pat the 4 whole bone-in pork chops completely dry with paper towels—this is non-negotiable for crispy skin. Season both sides generously with 1.5 tbsp kosher salt and 1 tsp freshly ground black pepper, pressing the seasoning into the meat. Let them sit at room temperature for 30 minutes while you prep the rest.
Heat a heavy skillet (cast iron works best) over medium-high heat until it's screaming hot. Add 2 tbsp olive oil and let it shimmer for 1 minute. Place the pork chops in the pan and sear undisturbed for 3-4 minutes per side until they develop a deep golden-brown crust. You'll know they're ready when they release easily from the pan—don't rush this step or you'll end up with dry meat.
👨🍳 Step 2: Build the Flour Slurry and Deglaze
Remove the pork chops to a plate and reduce heat to medium. Sprinkle 0.25 cup all-purpose flour over the browned bits in the pan, shaking gently to coat. Let it toast for 30 seconds until lightly golden—this adds depth to the sauce.
Slowly pour in 0.5 cup red wine, scraping up all those flavorful browned bits with a wooden spoon. Let it simmer for 2-3 minutes until the wine reduces by half and the mixture thickens slightly. Here's the thing—don't walk away. You want to capture every bit of flavor from the searing process.
🍳 Step 3: Create the Rich Sauce Base
Add 0.5 cup chicken stock, 0.25 cup heavy cream, 0.25 cup fresh thyme leaves, and the 4 smashed garlic cloves and 1 whole thinly sliced shallot to the pan. Bring to a gentle simmer and cook for 5-6 minutes until the sauce thickens enough to coat the back of a spoon. Taste and adjust seasoning—you might need a pinch more salt or a crack of pepper.
While the sauce simmers, check the pork chops' internal temperature with an instant-read thermometer. They should reach 135°F for medium-rare (juicy pink centers). If they're not quite there, return them to the pan for 1-2 minutes on each side—just until they reach your desired doneness. Overcooking is the enemy of juicy pork chops.
🥘 Step 4: Finish and Serve
Return the pork chops to the skillet with the sauce and let them bask in the heat for 1 minute to warm through. The sauce should coat the chops beautifully, creating that restaurant-quality presentation. Transfer the pork chops to a serving platter and tent loosely with foil to keep them warm while you plate.
Ladle the rich thyme-infused sauce over the pork chops and garnish with 0.125 cup chopped fresh parsley. The contrast of that crispy crust with the tender pink center and velvety sauce is what makes these pork chops truly apex. Serve immediately with roasted potatoes or a fresh green salad to soak up every last drop of that incredible sauce.
Pro Tips For Making Apex Pork Chop
- Pat the chops dry: Bone-in pork chops are stubborn about releasing moisture—skip the paper towels and use a clean kitchen towel instead. Press firmly for 10 seconds on each side; this isn’t just about browning, it’s about getting that butter to actually stick and crisp. I learned this the hard way when my first batch of flour-dusted chops just slid in the pan like greased-up hockey pucks.
- Salt the butter generously: Unsalted butter is your friend here, but don’t treat it like a neutral fat—add a pinch of kosher salt (about ¼ teaspoon per tablespoon) and let it melt into the pan before adding the chops. This ensures every bite gets that balanced seasoning, not just the surface. Yes, it sounds like overkill, but trust me: your chops will taste like they came from a restaurant, not a weeknight.
- Start screaming hot, then dial it down: Get that pan ripping hot before adding the butter—you should see smoke, but not flames. Once the butter foams and the chops release their first sear (about 2 minutes per side), turn the heat to medium-low. This two-step move prevents burning the butter while still locking in juices. I used to rush this, and my chops ended up either raw inside or bitter from overcooked butter.
- Rest them under foil: After searing, transfer the chops to a plate and tent loosely with foil for 5 minutes. This isn’t just about carryover cooking—it’s about letting the residual heat render fat and relax the muscle fibers so every slice is tender, not chewy. I know, I know, you want to eat them immediately, but resist the urge. Your future self will thank you.
Pro cooking tips for perfect results
Perfect Pan Prep
Start with a heavy cast-iron skillet—I swear by my Lodge 10.25-inch—because it retains heat like a dream. Preheat it over medium-high heat until it's ripping hot (a drop of water should sizzle and evaporate instantly).
Add 2 tbsp high-smoke-point olive oil (I use Avocado oil for its neutral flavor) and let it shimmer for 1 minute before adding the chops. The oil should be hot enough to make the salt sizzle when you sprinkle it on—this is your signal it's ready. 🔥
Never crowd the pan! Cook the chops one at a time if needed, or in two batches if your skillet is small. The goal is to create that deep golden-brown crust—what my mentor calls "the armor."
If you see steam instead of browning, your pan isn't hot enough. Let them sear undisturbed for 3-4 minutes per side, then check for doneness with a meat thermometer (I use ThermoWorks Smoke).
Clockwork Timing
The 30-minute room temperature rest before cooking is non-negotiable. Cold meat releases moisture when seared, which steams instead of crisps. Pat the chops dry as a bone with paper towels—this step alone makes the difference between a good chop and a great one.
I like to season them generously with Diamond Crystal kosher salt (it's coarser and clings better) and freshly cracked black pepper right before searing. 🌶️
Here's my pro trick: Flip the chops using tongs, not a spatula. A spatula can tear the crust, and we're going for that shatter-like glass texture. Once they reach 135°F internal temp (medium-rare), they're ready to move to the sauce.
If they're not quite there, return them to the pan for 1-2 minutes per side—just until they hit your target temp. Overcooking turns pork chops into shoe leather, and we're not going there.
Sauce Mastery
The sauce is where the magic happens, and timing is everything. After removing the chops, sprinkle ¼ cup sifted all-purpose flour over the browned bits and let it toast for 30 seconds—this adds a nutty depth to the sauce.
Deglaze immediately with ½ cup dry red wine (Cabernet works best), scraping up every last bit of flavor with a wooden spoon. Let it reduce by half before adding the chicken stock, heavy cream, thyme, garlic, and shallots. 🍷
Simmer the sauce for 5-6 minutes until it coats the back of a spoon. Taste and adjust seasoning—this is where you can fix any imbalances. If it's too thin, simmer longer; if too thick, add a splash of stock.
The sauce should be velvety but not gluey—just thick enough to cling to the chops. Return the pork chops to the pan for 1 minute to warm through and absorb that incredible sauce.
Resting Like a Pro
Transfer the chops to a warm platter and tent loosely with foil for 5 minutes—this lets the juices redistribute. Resting is crucial because pork chops continue cooking off the heat.
I like to garnish with chopped fresh parsley right before serving, as it adds a bright pop of color and freshness. The sauce should be ladled generously over the chops, not drizzled lightly. This is a restaurant-quality dish, and every detail matters. 💫
Serve immediately with roasted seasonal vegetables or creamy mashed potatoes to soak up that incredible sauce. The contrast of the crispy crust, juicy pink center, and rich sauce is what makes these pork chops truly apex.
And remember—practice makes perfect. The more you sear, the better you'll get at judging that golden-brown crust by sight alone.
Nutrition facts
Frequently asked questions
What makes these pork chops "apex" compared to regular recipes?
The "apex" comes from three key elements: precision searing for a shatter-like crust, clockwork timing to maintain juicy pink centers at 145°F, and a rich thyme-infused sauce that elevates them to restaurant quality. Unlike basic recipes, we focus on even cooking through room-temperature prep and temperature control with a meat thermometer.
Can I use boneless pork chops instead of bone-in?
You can, but bone-in chops stay juicier longer due to the moisture-retaining bone. For boneless cuts, reduce cooking time by 1-2 minutes per side since they cook faster. The sauce technique remains identical—just adjust doneness by checking internal temperature (135°F for medium-rare).
What's the best way to reheat leftover apex pork chops?
Reheat gently in a skillet over low heat with a splash of chicken stock (just enough to deglaze) for 2-3 minutes per side. Never microwave—it turns the meat rubbery. For the sauce, reheat separately over medium-low until warmed through, then combine. Add a pat of butter to keep the sauce velvety.
How do I adjust this recipe for thicker or thinner chops?
For thicker cuts (>1.5 inches), increase searing time by 1 minute per side and check for 145°F internal temp. For thinner cuts (<0.75 inches), reduce searing to 2 minutes per side and finish immediately in the sauce. Always use a thermometer—never guess!
Can I make this recipe ahead of time?
Prep the sauce 1 day ahead and store it refrigerated. Cook the chops fresh day-of, then reheat as directed. For make-ahead chops, par-cook to 130°F**, then finish when ready to serve. The sauce actually improves overnight as flavors meld—just reheat gently.