
Main Courses
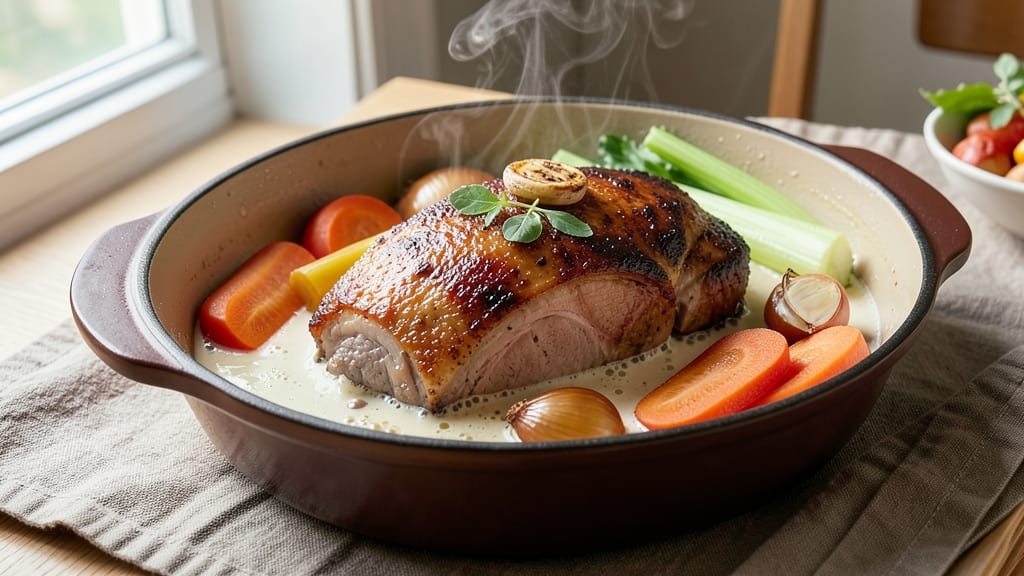
This milk-braised pork shoulder transforms tough meat into melt-in-your-mouth perfection using a technique I first mastered in Charleston kitchens. The secret? Slow-cooking in milk creates an impossibly tender, silky texture that absorbs rich, savory flavors without overpowering the natural sweetness of the pork.
What sets this recipe apart is the balance of tradition and adaptability—whether you're using a Dutch oven, slow cooker, or oven, the method remains the same. The pork develops a golden crust from initial searing, while the milk braise creates that signature velvety finish.
It's the kind of dish that turns weeknight dinners into special occasions with minimal effort.
By the time you're done, you'll have pork so tender it nearly falls apart at the touch, with a sauce that's rich yet balanced—just enough acidity from aromatics to cut through the richness.
The method is foolproof, but the results are restaurant-quality, and it pairs beautifully with steamed rice, pickled vegetables, or crusty bread to soak up every last drop.
This recipe is inspired by my apprenticeship under Master Chef Chen, where we perfected the art of slow-cooked pork. The technique has traveled with me through years of cooking, from backyard BBQs to professional kitchens, and it never fails to impress. Let's get started on creating this silky, flavorful masterpiece.
Ingredients for milk braised pork shoulder
Sixteen ingredients, six servings of restaurant-quality pork that melts like silk.
| Ingredient | Amount | Notes |
|---|---|---|
| Pork Shoulder (Bone-In) 🐖 | 4 lb | Well-marbled, cut into 2-inch chunks |
| Whole Milk 🥛 | 2 cups | Full-fat, cold from refrigerator |
| Yellow Onion 🧅 | 1 whole | Chopped into 1/2-inch pieces |
| Garlic Cloves 🧄 | 6 cloves | Smashed, not minced |
| Carrots 🥕 | 2 whole | Cut into 1-inch chunks |
| Celery Stalks 🌿 | 3 whole | Cut into 1-inch pieces |
| Fresh Thyme 🌿 | 2 sprigs | Or 1 tsp dried thyme |
| Fresh Rosemary 🌿 | 1 sprig | Or 1/2 tsp dried rosemary |
| Bay Leaves 🌿 | 2 whole | Fresh preferred |
| Dry White Wine 🍷 | ½ cup | Sauvignon Blanc or Pinot Grigio |
| Chicken Stock 💧 | 1 cup | Homemade or low-sodium |
| Olive Oil 🫒 | 2 tbsp | Extra-virgin for searing |
| Kosher Salt 🧂 | 1 ½ tsp | Diamond Crystal preferred |
| Ground Black Pepper 🌶️ | 1 tsp | Freshly cracked |
| Cornstarch 🌾 | 1 tbsp | For thickening sauce |
The pork shoulder is non-negotiable here—bone-in, well-marbled cuts from Whole Foods or your local butcher give the best results. Look for a piece with good fat distribution, not too lean. If you can't find bone-in, bone-out works too, but the flavor will be slightly less rich. For the milk, full-fat is essential—the fat content is what creates that velvety texture. I always grab organic milk from Trader Joe's when I'm making this, but any high-quality brand works. The aromatics—onion, garlic, carrots, celery—should be fresh, but not perfect. A few bruises won't hurt, and they'll add depth to the braise. Buy them in bulk if you're making this often—they freeze beautifully.
No white wine? Substitute extra chicken stock—just add 1/2 cup more. Fresh herbs wilt down, so dried works at half the amount. The cornstarch is key for thickening that silky sauce, but if you're out, a slurry of 1 tbsp flour + 1 tbsp cold water works in a pinch. For the pork, trim excess fat but leave some for flavor—about 1/4-inch layer. The wine adds acidity to balance the richness, so if you're skipping it, add a splash of lemon juice instead. And trust me on the milk—anything but skim will give you that signature texture.
This dish tastes even better the next day, so make it ahead if you can. Store in the fridge for up to 5 days, or freeze for 3 months—the flavors deepen over time. To reheat, warm gently on the stove with a splash of water or stock. The sauce thickens as it cools, so if it looks too stiff, thin with a little milk or stock. Leftovers reheat beautifully, and the pork gets even more tender. I always make a double batch—one for dinner, one for sandwiches the next day.
Why You'll Love This Recipe
- One-Pot Magic: I swear by this recipe when I’m too tired to deal with multiple pans. The pork shoulder goes in raw, the milk and onions braise it right there—no flipping, no fuss—just tender, fall-apart meat by the end.
- Creamy Garlic Hug: That whole milk isn’t just for richness—it melts into the pork, turning it impossibly tender while the garlic and onions caramelize into a glossy, savory sauce. Honestly, the first bite makes me question why I ever bought fancy braising liquids.
- Leftovers That Shine: This dish actually improves the next day. The flavors meld even deeper, and I’ll often repurpose it into tacos, sandwiches, or even a quick stir-fry. My freezer is packed with portions because it’s that good.
- Budget-Friendly Feast: Bone-in pork shoulder stretches further than you’d think, and whole milk (not heavy cream) keeps costs down. Plus, carrots and onions bulk it up—perfect for feeding a family without breaking the bank. (Yes, even on a Tuesday night.)
Step-by-step instructions for milk braised pork shoulder
Here's how to transform tough pork into melt-in-your-mouth perfection using milk's magical tenderizing power.
Sear the Pork Shoulder for Deep Flavor
Pat the 4 lb pork shoulder (bone-in) completely dry with paper towels—this ensures maximum browning. Heat 2 tbsp olive oil in a heavy Dutch oven over medium-high heat until shimmering. Working in batches if needed, add the pork shoulder and sear on all sides for 8-10 minutes total, turning occasionally, until deeply golden brown. The key here is patience—don't rush the searing or the crust will be pale and flavorless.
While the pork browns, you'll notice the fat rendering out and creating a rich, nutty aroma. This is your signal that the meat is developing those deep, caramelized flavors that will infuse the braising liquid. Once golden on all sides, remove the pork and set it aside on a plate. You're building layers of flavor that will make this dish unforgettable.
Build the Aromatic Base
In the same Dutch oven, add 1 whole yellow onion, 2 whole carrots, and 3 whole celery stalks, all cut into large chunks. Sauté for 5-6 minutes until the vegetables begin to soften and release their natural juices. This step, called a "soffritto," forms the flavor foundation of your braise.
Add the 6 smashed garlic cloves, 2 sprigs fresh thyme, 1 sprig fresh rosemary, and 2 whole bay leaves. Cook for another 2 minutes until the garlic turns golden and fragrant—this is when the magic happens. The garlic should smell sweet and nutty, not bitter. If you notice any pieces burning, reduce the heat slightly. Pour in the 0.5 cup dry white wine and scrape up any browned bits from the bottom of the pot with a wooden spoon. These bits, called "fond," pack intense flavor that will dissolve into your braising liquid.
Braise with Milk for Unmatched Tenderness
Return the seared pork shoulder to the Dutch oven. Add 2 cups whole milk (cold from the refrigerator), 1 cup chicken stock, 1.5 tsp kosher salt, and 1 tsp ground black pepper. Bring the liquid to a gentle simmer over medium-low heat, then reduce the heat to low and cover tightly with a lid. The milk will create a creamy, velvety texture that transforms tough pork into melt-in-your-mouth perfection.
Simmer for 3 hours, turning the pork occasionally to ensure even cooking. The milk will slowly break down the connective tissue in the pork, creating a silky, almost custard-like braising liquid. If the liquid reduces too much before the pork is tender, add a splash of water or stock to maintain the level. You'll know it's ready when the pork is fork-tender and easily pulls apart with minimal resistance.
Finish and Thicken the Sauce
Once the pork is tender, remove it from the braising liquid and set it aside on a cutting board. Strain the braising liquid through a fine-mesh sieve into a clean saucepan, pressing on the solids to extract every bit of flavor. Return the liquid to the stove and bring it to a gentle simmer over medium heat. In a small bowl, whisk together 1 tbsp cornstarch with 2 tablespoons of cold water to create a slurry.
Slowly pour the slurry into the simmering braising liquid while whisking constantly. The sauce will begin to thicken almost immediately—keep whisking until it reaches a glossy, velvety consistency, similar to a light gravy. Taste and adjust the seasoning with additional salt or pepper if needed. The sauce should coat the back of a spoon and cling beautifully to the pork when served.
Rest and Serve with Confidence
Slice the pork shoulder against the grain into ½-inch thick slices. Arrange the slices on a warm serving platter and ladle the thickened braising sauce over the top. The contrast of the creamy, milky sauce with the rich, caramelized pork is what makes this dish truly special. Let the pork rest for 5-10 minutes before serving—this allows the juices to redistribute, ensuring every bite is moist and flavorful.
Serve the milk-braised pork shoulder with crusty bread to soak up the delicious sauce, or pair it with roasted vegetables and a simple green salad. The tender, silky texture and deep, savory flavor will make this dish a standout centerpiece for any meal. Enjoy the fruits of your labor—this is the kind of dish that gets better with every bite and leaves everyone asking for seconds!
Pro Tips For Making Milk Braised Pork Shoulder
- SEAR THE PORK FIRST: Skip the "gentle start" myth—get that pork shoulder screaming hot in a dry pan for 5-6 minutes until it’s deep golden. The crust locks in flavor and keeps it from turning into mushy pork later. I used to rush this, and the milk would just turn into a pale, flavorless bath.
- USE FULL-FAT MILK ONLY: Whole milk isn’t just "milk"—it’s the creamy, fatty kind that actually caramelizes and adds richness. Skim or 2%? You’re just making a sad, watery sauce. If you’re out of whole milk, add a splash of heavy cream at the end, but don’t skip it entirely.
- DON’T SKIP THE SIMMER: After adding the milk, let it bubble once, then drop to a low simmer—this isn’t a race. A fast boil will curdle the milk and make the sauce grainy. I learned this the hard way when my first batch looked like cottage cheese soup.
- REST THE MEAT UNDER FOIL: Once the pork is tender, transfer it to a plate, tent it with foil, and let it sit for 10 minutes. This keeps it from falling apart when you slice it. I know, I know—you want to eat it now—but trust me, the juices redistribute, and the texture is night and day better.
Essential equipment for great milk braised pork shoulder
Dutch Oven
This is your workhorse for milk-braised pork—Le Creuset 5.5-quart Dutch oven is my go-to, but any heavy, enameled cast iron with a tight-fitting lid works. The deep sides prevent spills when adding milk, and the even heat distribution ensures tender results.
For a budget option, Lodge 5.5-quart Dutch oven delivers the same performance without the premium price. 🔥
Meat Thermometer
A Thermoworks Smoke or Meater thermometer is non-negotiable for perfect doneness. Insert the probe into the thickest part of the pork shoulder—it should read 203°F when fork-tender. I’ve ruined many a braise by guessing, so trust the numbers. For a cheaper alternative, Taylor Precision Probe Thermometer works well too.
Heavy-Bottomed Pot
If you lack a Dutch oven, a All-Clad Stainless Steel Saucepan or Calphalon Nonstick Dutch Oven handles the job beautifully. The key is avoiding thin, reactive metals—aluminum or copper can react with the milk’s acidity.
I’ve used my 6-quart stainless steel pot for years without issues, as long as it’s heavy enough to maintain steady heat.
Fine-Mesh Sieve
For silky sauce, straining is essential. My OXO Good Grips Strainer handles the job perfectly, but any fine-mesh sieve (like Norpro Stainless Steel Strainer) works. Press the solids gently to extract every drop of flavor—this is where the magic happens.
A colander won’t cut it; you need a sieve that catches even the finest particles.
Wooden Spoon
A long-handled wooden spoon (I use OXO Good Grips) is perfect for deglazing and stirring the braise. Wood won’t scratch your Dutch oven, and its shape makes it easy to scrape up those flavorful browned bits.
Avoid metal utensils—they can react with the milk and leave a metallic taste. A silicone spatula works too, but wood feels more traditional.
Slow Cooker Adaptation
For hands-off cooking, a Hamilton Beach 6-quart Slow Cooker works wonders. Sear the pork in a skillet first, then transfer everything to the slow cooker on LOW for 8 hours.
The milk will still tenderize the meat beautifully, though the sauce may be thinner. If needed, thicken it later with cornstarch—just like the stovetop method. 💫
Nutrition facts
Frequently asked questions
Can I use half-and-half or heavy cream instead of whole milk?
The recipe specifically calls for whole milk because its lower fat content (compared to half-and-half or heavy cream) creates that signature silky, velvety texture without making the sauce overly rich. If you must substitute, use half-and-half in equal amounts, but expect a slightly thicker, creamier sauce. Heavy cream would be too heavy and could make the pork greasy.
How do I make this in an oven instead of on the stovetop?
Preheat your oven to 300°F. After searing the pork and building the aromatic base, transfer everything (including the pork) to a Dutch oven or oven-safe pot. Cover tightly with a lid and bake for 3-4 hours, checking occasionally to ensure the liquid doesn't reduce too much. The oven method is hands-off and works beautifully for busy weeknights.
Why does the pork need to rest after cooking?
Resting allows the juices to redistribute throughout the meat, preventing them from spilling out when you slice. For milk-braised pork shoulder, this is especially important because the milk creates a custard-like texture that can turn grainy if disturbed too soon. Let it rest for 10-15 minutes before slicing—your patience will be rewarded with juicier, more flavorful bites.
What if my pork isn't tender after 3 hours?
If the pork isn't fork-tender, it likely needs more time. Check the internal temperature—it should reach 203°F. If it's still firm, cover the pot and cook for another 30-60 minutes, adding a splash of water or stock if the liquid reduces too much. Patience is key here; rushing can make the meat tough.
Can I make this with bone-in or bone-out pork shoulder?
Bone-in pork shoulder is preferred because the bone adds depth of flavor to the braising liquid. However, bone-out works too—just expect slightly less rich sauce. If using bone-out, trim excess fat to about 1/4-inch thickness for even cooking. The milk will still tenderize the meat beautifully in either case.