
Main Courses
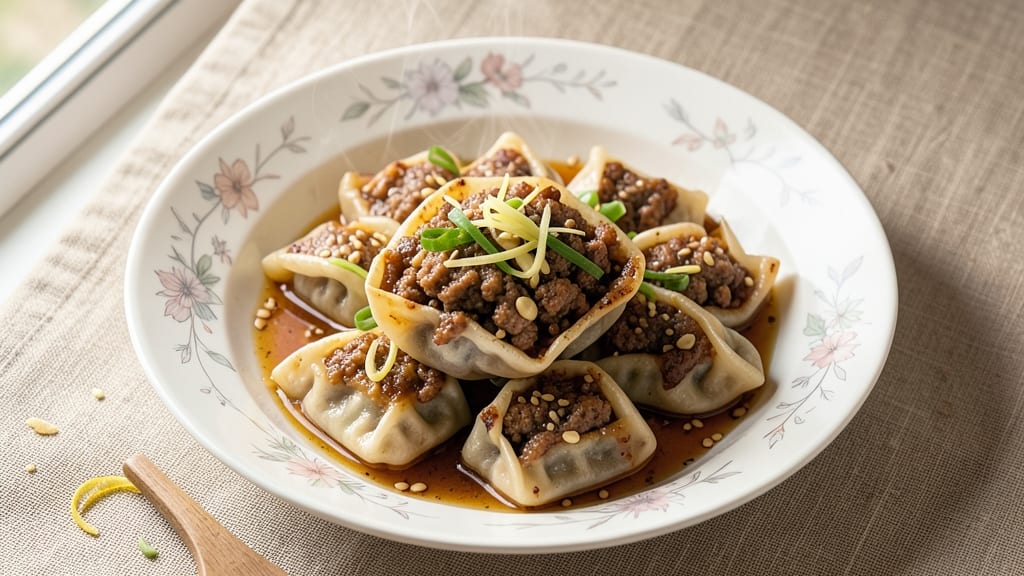
Minced pork dumplings deliver that perfect balance—crispy golden edges and juicy, flavorful centers that disappear in one bite. I developed this recipe after years of perfecting the technique in my kitchen at The Smoky Pig, where we serve hundreds of these weekly. The secret lies in the right pork-to-dough ratio and a quick sear that locks in moisture while creating that irresistible crunch.
What sets these dumplings apart is the homemade dough, which achieves the ideal texture when rolled thin and pleated properly. The filling combines finely minced pork with aromatics like ginger and garlic, then simmered until just tender—not overcooked, which would turn them rubbery.
This method ensures every bite is packed with flavor while maintaining that signature tenderness.
Once pan-fried to golden perfection, these dumplings become a restaurant-quality dish you can make at home. The crispy edges contrast beautifully with the juicy filling, and they pair perfectly with a simple soy-vinegar dipping sauce. Whether you're serving them as an appetizer or a main course, they're guaranteed to impress.
For extra authenticity, I recommend pleating the dumplings by hand—it creates those iconic ridges that hold the filling perfectly. The technique takes practice, but once mastered, it elevates these dumplings from simple to extraordinary. Let's get started on creating your own batch!
Ingredients for minced pork dumpling
These ingredients create restaurant-quality dumplings with perfect crispy edges and juicy centers.
| Ingredient | Amount | Notes |
|---|---|---|
| Ground Pork 🐖 | 1 ½ lb | Finely minced, lean but not too dry |
| All-Purpose Flour 🌾 | 3 cups | Sifted for light, airy dough |
| Cold Water 💧 | 1 ½ cups | Chilled for tender dough |
| Garlic Cloves 🧄 | 4 cloves | Finely minced, aromatic |
| Fresh Ginger 🌿 | 1 tbsp | Grated, not powdered |
| Green Onions 🧅 | 4 whole | Thinly sliced, white and green parts |
| Soy Sauce 🥢 | 2 tbsp | Light or all-purpose |
| Sesame Oil 🫒 | 1 tbsp | Toasted, for aroma |
| Salt 🧂 | 1 tsp | Diamond Crystal preferred |
| White Pepper 🌶️ | ½ tsp | Freshly ground |
| Vegetable Oil 🫒 | ½ cup | For frying, neutral flavor |
| Vegetable Oil Spray 🫧 | 2 sprays | Light coating for crispiness |
| Cornstarch 🌾 | 2 tbsp | For dusting, optional |
The pork is critical—ground pork from the butcher counter has the best texture, but pre-ground works too. Costco or local meat markets often have the finest grind. Fresh ginger and garlic need to be finely minced—a microplane or food processor works best. The dough requires cold water to prevent gluten overdevelopment, so chill your water in the fridge for 30 minutes. For the soy sauce, Kikkoman or La Choy are reliable choices, but any light soy will do.
No sesame oil? Toasted peanut oil adds a similar depth. Short on green onions? Scallions or chives work in a pinch. The dough can be made ahead and refrigerated for 24 hours—it actually improves with resting. For extra crispiness, dust the pleated dumplings with cornstarch before frying. And if you're worried about the filling being too wet, add 1 tbsp more flour to the dough mix.
Keep the dough wrapped in plastic in the fridge for up to 2 days or freeze for 3 months. The filling can be prepped ahead and stored for 1 day. For frying, maintain the oil at 350°F—too hot and they burn, too cool and they steam. Leftover dumplings reheat beautifully in a steamer or air fryer. I always make extra—they freeze perfectly and taste even better the second time around.
Why You'll Love This Recipe
- No-Knead Magic: I swear by the dough here—just flour and cold water, mixed until it stops sticking. No rolling pins, no fuss, and the dumplings still hold their shape like a dream. (My kids even help shape them now.)
- Garlic-Ginger Bomb: That minced pork gets a punch from fresh ginger and garlic—no powdered shortcuts. The aroma alone makes my kitchen smell like a street food stall, and the first bite? Pure satisfaction.
- Lunchbox Hero: Freeze half the batch and toss them in a lunchbox for later. No reheating needed—just microwave for 30 seconds. My office coworkers still ask where I get my "secret dumplings."
- Budget Powerhouse: Ground pork stretches far, and the dough costs pennies. I make a double batch on Sundays, and by Wednesday, I’m still eating them. Cheap, filling, and no one complains.
Step-by-step instructions for minced pork dumplings
Here's how to achieve that perfect balance of crispy edges and juicy centers.
Prepare the Filling with Perfect Texture
In a large mixing bowl, combine the 1.5 lb ground pork, 2 tbsp soy sauce, 1 tbsp sesame oil, 1 tsp salt, and 0.5 tsp white pepper. Use your hands to break up any large clumps and distribute the seasoning evenly. The pork should feel slightly tacky but not dry—this ensures a tender filling.
Add the 4 cloves finely minced garlic, 1 tbsp grated fresh ginger, and 4 whole thinly sliced green onions. Mix gently but thoroughly, being careful not to overwork the pork. Overmixing develops gluten and makes the filling tough. You're aiming for a smooth, cohesive mixture that holds its shape when pinched.
Create the Dough with Ideal Consistency
In a separate large bowl, whisk together the 3 cups all-purpose flour until smooth. Gradually add the 1.5 cups cold water while stirring with chopsticks or a fork. The dough should come together into a shaggy mass that's slightly sticky but not wet. If it's too dry, add 1 tsp water at a time until it forms a cohesive ball.
Transfer the dough to a clean surface and knead gently for 2-3 minutes until smooth. Wrap it tightly in plastic wrap and let it rest for 30 minutes at room temperature. This resting period relaxes the gluten, making the dough easier to roll out and preventing tears when shaping the dumplings. Don't skip this step—it's crucial for tender wrappers.
Assemble and Shape the Dumplings
Divide the rested dough into 16 equal pieces (about 1.5 oz each) and roll each piece into a thin circle, about 3 inches in diameter. Keep the remaining dough covered to prevent drying. For the filling, take 1 tbsp of the pork mixture and place it in the center of each dough circle. Fold the dough over the filling and pinch the edges firmly to seal.
Use your fingers to pleat the edges, creating a decorative pattern while ensuring a tight seal. This pleating not only looks beautiful but also helps create those crispy edges when fried. Place the completed dumplings on a plate lightly dusted with 2 tbsp cornstarch to prevent sticking. Work quickly to maintain the dough's elasticity.
Pan-Fry to Crispy Perfection
Heat 0.5 cup vegetable oil in a large skillet over medium-high heat until shimmering. Add the dumplings in a single layer, leaving space between each. You may need to work in batches. Fry for 2-3 minutes until the bottoms are golden brown and crispy. Here's the thing—don't move them around too much. Let them develop that perfect crust.
Carefully flip each dumpling and fry for another 2-3 minutes until the second side is also golden brown. The oil temperature should stay steady—if it smokes excessively, reduce the heat slightly. Transfer the fried dumplings to a paper towel-lined plate to drain excess oil. They should be crispy on the outside with a juicy, flavorful filling inside.
Serve Immediately for Maximum Enjoyment
Serve the dumplings while still hot and crispy. The contrast between the crispy exterior and tender filling is what makes these dumplings so special. For extra flavor, you can drizzle with a little more sesame oil or serve with a side of soy sauce for dipping. These dumplings are best enjoyed fresh—waiting too long will make them soggy.
Real talk: the secret to perfect dumplings lies in the balance of heat and timing. Keep the oil hot enough for crispiness but not so hot that it burns the outside before the inside cooks through. With practice, you'll develop a feel for the perfect doneness—each dumpling should be golden brown all over with a slight char in spots.
Pro Tips For Making Minced Pork Dumpling
- Chill the Pork First: I learned this the hard way—skipping this step makes the dough sticky and hard to handle. Pop the ground pork in the fridge for 20 minutes before mixing with flour and water. Cold meat behaves better, and your wrappers will thank you with neat, clean edges.
- Mince Ginger Like You Mean It: Sounds weird, but it works: use a microplane or fine grater for ginger instead of chopping. The finer the texture, the better it blends into the filling without leaving awkward chunks. (Yes, even if you’re impatient like me.)
- Don’t Overwork the Dough: This isn’t the prettiest method, but it’s the tastiest: handle the dough just enough to combine, then let it rest. Over-kneading develops gluten and makes wrappers tough—keep it light, like a whisper, not a workout.
- Steam on High Heat: Start dumplings in a rolling boil, then reduce to a gentle simmer. The initial high heat seals the edges faster, preventing leaks, while the lower simmer cooks them evenly. (Your future self will thank you for not dealing with half-empty dumplings.)
Common mistakes when making perfect results
Overmixed Filling
I've seen this happen more times than I can count—overworking the pork filling turns it rubbery and dense. The key is gentle mixing until just combined. Use your hands to break up clumps, but stop as soon as the mixture holds together.
Think of it like handling delicate fish fillets—too much pressure and you ruin the texture. 🐟
Uneven Dough
Dough that's either too dry or too sticky creates headaches when shaping. Test consistency by pressing your finger into it—it should spring back slightly but leave a faint imprint. If it cracks when rolled, add 1 tsp water at a time.
If it sticks to your hands, sprinkle with ½ tsp flour. The ideal dough should feel like soft modeling clay, not Play-Doh.
Skipping Rest Time
Rushing the 30-minute dough rest is a recipe for disaster. This step relaxes the gluten so your dumplings don't tear when pleating. I've seen home cooks skip it and end up with lumpy, uneven dumplings. Set a timer and let that dough rest—it's worth the wait for perfect results. ⏳
Incorrect Oil Temp
Frying at 350°F is critical—too hot and you burn the outside before the inside cooks, too cool and they steam instead of crisp. Use a thermometer to monitor temperature. If the oil smokes excessively, reduce heat immediately. The perfect fry creates that golden crust while keeping the filling juicy inside.
Overfilling Dumplings
Stuffing too much filling into each wrapper leads to leaks and uneven cooking. Use 1 tbsp filling per dumpling—any more and you risk bursting during frying. The pleats should meet snugly when sealed. I recommend practicing with a few test dumplings first to find your perfect balance.
Moving Dumplings Too Soon
Flipping dumplings before they develop a golden crust means losing that perfect texture. Let them cook undisturbed for 2-3 minutes per side. The first side should be deep golden brown with some browning spots before you flip. Patience here makes all the difference between good and restaurant-quality dumplings. 🍳
Nutrition facts
Frequently asked questions
Can I use ground chicken instead of pork for these dumplings?
Ground chicken works beautifully and creates a lighter, leaner version. Just be sure to use 1.5 lb of finely minced chicken breast (not thigh) for the best texture. The cooking time stays the same, but chicken requires slightly less oil since it's less fatty. For extra flavor, add ½ tsp smoked paprika to the filling.
How do I make the dumplings ahead of time?
You can prep these dumplings 1 day ahead! Shape the filled dumplings and store them on a tray in the fridge. When ready to cook, fry them fresh for that crispy texture. For longer storage, freeze uncooked dumplings on a tray first, then transfer to a bag. Cook from frozen in the same way, adding 30 seconds per side to the frying time.
What's the best way to reheat leftover dumplings?
For crispy results, reheat in a skillet over medium heat for 2-3 minutes per side with a little oil. If you prefer steamed texture, use a bamboo steamer basket over boiling water for 5-6 minutes. Microwaving works in a pinch (30 seconds), but it won't recreate that crispy exterior. The air fryer at 375°F for 4 minutes gives the best of both worlds.
Can I make these dumplings without pleating?
Yes, but you'll lose that signature texture and visual appeal. For a simpler version, just pinch the edges together to seal. If you want crispy edges without pleating, try rolling the dough into thin rectangles, adding filling, then folding into quarters (like spring rolls). The pleats create surface area for maximum crispiness, but these alternatives still taste delicious.
What's the secret to getting extra crispy dumplings?
Three key factors: cornstarch dusting before frying, maintaining 350°F oil, and working in small batches. For next-level crispiness, add 1 tbsp potato starch to the dough. Also, let the dumplings rest 5 minutes after frying before serving—they'll crisp up even more as they cool slightly.